第1章:初识 Scala
1. Scala概述
- Scala是一门多范式的编程语言,设计初衷集成面向对象编程和函数式编程的各种特性
- Scala运行于Java平台(Java虚拟机),并兼容现有的Java程序
- Scala combines object-oriented and functional programming in one concise, high-level language. Scala’s static types help avoid bugs in complex applications, and its JVM and JavaScript runtimes let you build high-performance systems with easy access to huge ecosystems of libraries.
2. Scala安装
- Java8
1 | Thpffcj:software thpffcj$ echo $JAVA_HOME |
- 下载并解压Scala
- 配置到系统环境变量
1 | Thpffcj:software thpffcj$ vi ~/.bash_profile |
3. Scala使用入门及对比Java
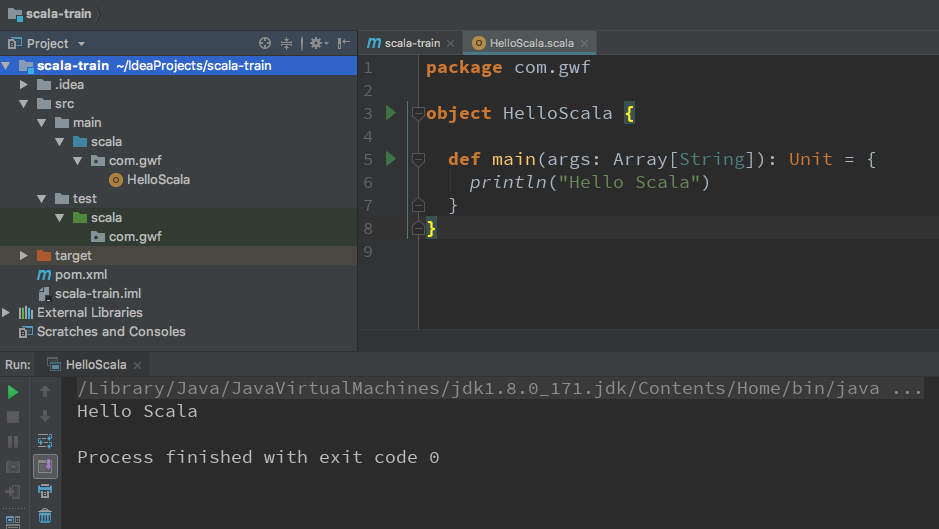
1 | Thpffcj:bin thpffcj$ ./scala |
HelloWorld
1 | public class HelloWorld{ |
- Scala每行代码并不强求使用;结束,但是Java是必须的
1 | object HelloWorld { |
- 将上面代码保存为HelloWorld.scala
1 | Thpffcj:data thpffcj$ scalac HelloWorld.scala |
第2章:Scala 入门
1. val vs var
- val:值
- val 值名称:类型 = xxx
1 | scala> val money = 100 |
- var:变量
- var 值名称:类型 = xxx
1 | scala> var name:String = "zhangsan" |
2. 基本数据类型
- Byte/Char
- Short/Int/Long/Float/Double
- Boolean
1 | scala> val a:Int = 10 |
- 类型转换
1 | scala> val f = 10 |
3. lazy在Scala中的应用
耗费计算网路的时候可以使用 lazy
1 | scala> val i = 1 |
- 我们现在想读取文件
1 | scala> import scala.io.Source._ |
4. Scala 常用 IDE
- IDEA
- Eclipse
- NetBeans
5. 使用IDEA整合Maven构建应用程序
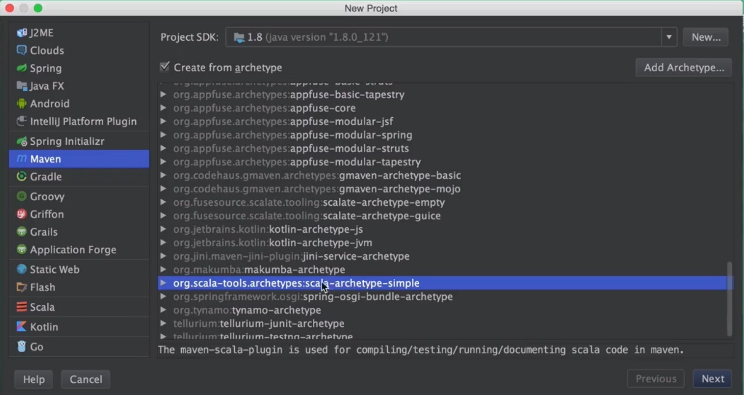
- 新建项目勾选 Create from archetype 并选择 scala-archetype-simple
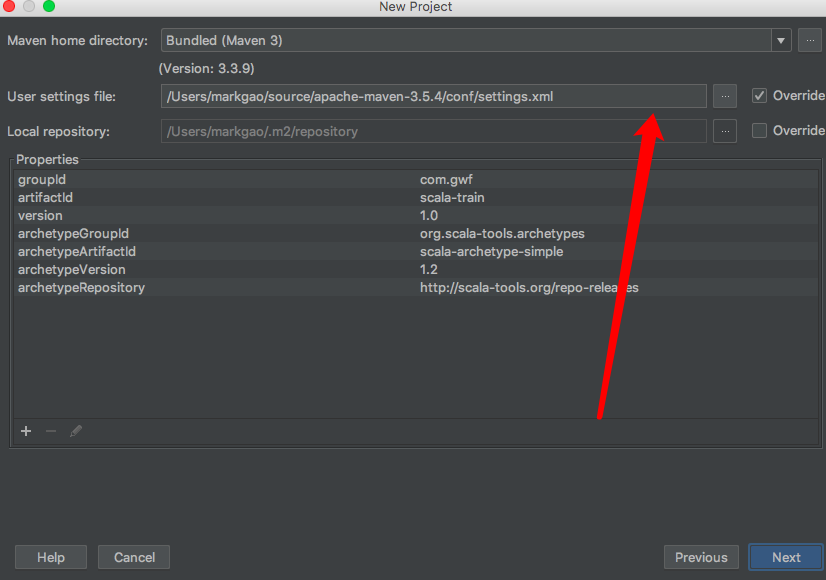
- 起项目名一路 Next,选择自己安装的 Maven 地址,然后继续 Next
-
第一次创建项目需要下载依赖包可能会比较慢
-
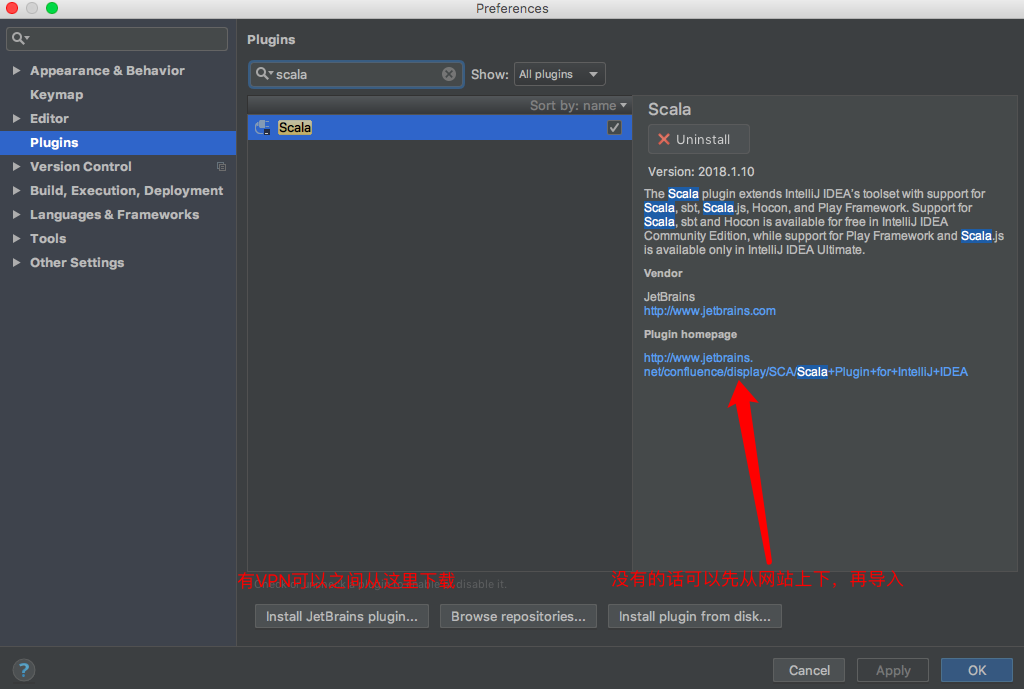
去Plugin里下载Scala的Plugin,下载完成后重启
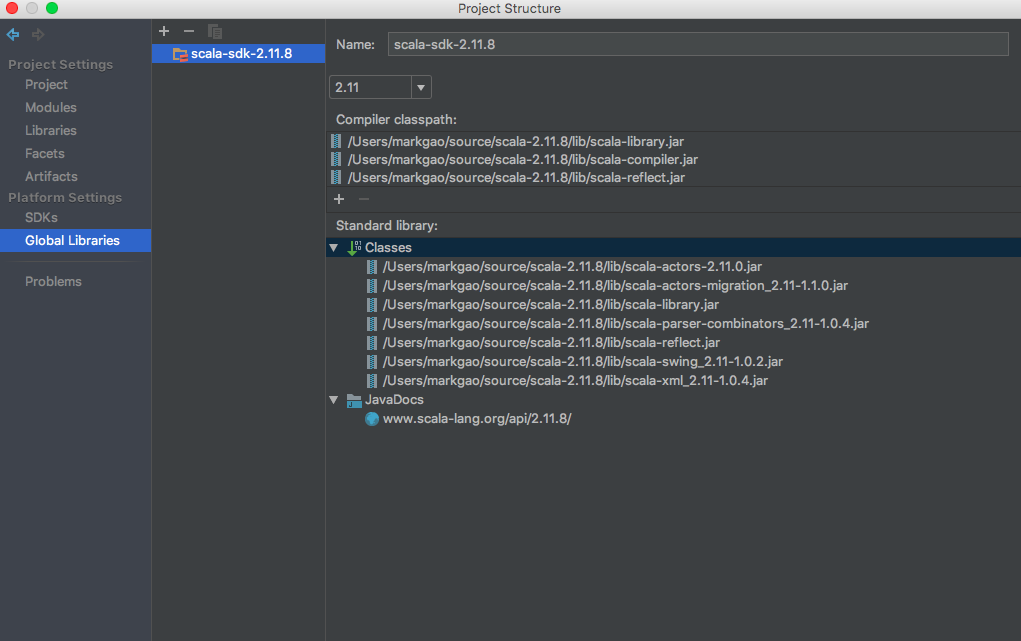
- 添加Scala-SDK
- 编写Hello World程序
第3章:Scala 函数
1. 方法的定义和使用
- 函数/方法的定义
1 | def 方法名(参数名:参数类型): 返回值 类型 = { |

- 我们去IDEA中试验一下
1 | object FunctionApp { |
2. 默认参数的使用
- 在函数定义时,允许指定参数的默认值
1 | def sayName(name:String = "Frank"): Unit = { |
- 我们来看一下默认参数在Spark中的使用
1 | ./spark-shell --help |
- 如果你没有设置配置文件,它将会去寻找conf下的spark-defaults.conf
3. 命名函数的使用
1 | def main(args: Array[String]): Unit = { |
4. 可变参数的使用
- JDK5+:可变参数
1 | def main(args: Array[String]): Unit = { |
5. 条件表达式
1 | if(a>0) true else false |
6. 循环表达式
- to:左闭右闭
- Range:左闭右开
- until:左闭右开
1 | scala> 1 to 10 // 左闭右闭 |
- for循环
1 | def main(args: Array[String]): Unit = { |
- while循环
1 | def main(args: Array[String]): Unit = { |
第4章:Scala 面向对象
1. 面向对象概述
- 封装:属性,方法封装到类中
- Person
- private int id, String name, Date birthday… getter/setter
- eat sleep …
- Person
- 继承:父类和子类之间的关系
- User extends Person
- 多态:父类引用指向子类对象(精髓所在 / 开发框架的基石)
- Person person = new Person();
- User user = new User();
- Person person = new User();
2. 类的定义与使用
1 | object SimpleObjectApp { |
3. 构造器
1 | object ConstructorApp { |
4. 继承与重写
- 继承
1 | object ConstructorApp { |
- 重写
1 | class Student(name:String, age:Int, var major:String) extends Person(name, age) { |
5. 抽象类
1 | object AbstractApp { |
6. 伴生类和伴生对象
1 | /** |
7. apply
1 | object ApplyApp { |
8. case class
1 | // 通常用在模式匹配 |
9. trait
- Scala中的Triat是一种特殊的概念
- 首先我们可以将Trait作为接口来使用,此时的Triat就与Java中的接口非常类似
- 在triat中可以定义抽象方法,就与抽象类中的抽象方法一样,只要不给出方法的具体实现即可
- 类可以使用extends关键字继承trait,注意,这里不是implement,而是extends,在scala中没有implement的概念,无论继承类还是trait,统一都是extends
- 类继承trait后,必须实现其中的抽象方法,实现时不需要使用override关键字
- scala 不支持对类进行多继承,但是支持多重继承trait,使用with关键字即可
- xxx extends ATrait with BTrait
1 | class SparkConf(loadDefaults: Boolean) |
第5章:Scala 集合
1. 数组
定长数组
1 | scala> val a = new Array[String](5) |
- 我们再来看一种其他创建数组的方法,其实它就是用了上面我们提到的apply
1 | scala> val b = Array("hadoop", "spark", "storm") |
- 我们看看数组的其他方法
1 | scala> val c = Array(2, 3, 4, 5, 6, 7, 8, 9) |
变长数组
1 | scala> val d = scala.collection.mutable.ArrayBuffer[Int]() |
- 对可变数组进行操作
1 | d += 1 |
- 我们看到最后的结果是ArrayBuffer(0, 2, 3, 4, 5, 6)
- 我们如何对变长数组迭代呢
1 | for (i <- (0 until d.length).reverse) { |
- 可变数组可以通过toArray方法变为定长数组
1 | scala> d.toArray |
2. List
1 | scala> val l = List(1, 2, 3, 4, 5) |
- 我们也可以创建变长list
1 | scala> val l5 = scala.collection.mutable.ListBuffer[Int]() |
- 接下来我们看个方法,这个方法可以完成求和操作
1 | def sum(nums:Int*):Int = { |
3. Set
1 | scala> val set = Set(1, 2, 2, 1, 4, 3) |
4. Map
- Map(映射)是一种可迭代的键值对(key/value)结构
- 所有的值都可以通过键来获取
- Map 中的键都是唯一的
- Map 也叫哈希表(Hash tables)
- Map 有两种类型,可变与不可变,区别在于可变对象可以修改它,而不可变对象不可以
- 默认情况下 Scala 使用不可变 Map。如果你需要使用可变集合,你需要显式的引入 import scala.collection.mutable.Map 类
1 | // 空哈希表,键为字符串,值为整型 |
- 定义 Map 时,需要为键值对定义类型。如果需要添加 key-value 对,可以使用 + 号
1 | A += ('I' -> 1) |
Map 基本操作
- keys:返回 Map 所有的键(key)
- values:返回 Map 所有的值(value)
- isEmpty:在 Map 为空时返回true
1 | object Test { |
- 输出结果为:
1 | colors 中的键为 : Set(red, azure, peru) |
- 你可以使用 ++ 运算符或 Map.++() 方法来连接两个 Map,Map 合并时会移除重复的 key
1 | object Test { |
- 以下通过 foreach 循环输出 Map 中的 keys 和 values
1 | object Test { |
5. Option & Some & None
1 | object OptionApp extends App { |
6. Tuple
- 与列表一样,元组也是不可变的,但与列表不同的是元组可以包含不同类型的元素
- 元组的值是通过将单个的值包含在圆括号中构成的
1 | scala> val t = (1, 3.14, "Fred") |
- 访问元组的元素可以通过数字索引,我们可以使用 t._1 访问第一个元素, t._2 访问第二个元素
1 | object Test { |
- 你可以使用 Tuple.productIterator() 方法来迭代输出元组的所有元素
1 | object Test { |
第6章:Scala 模式匹配
1. 基本数据类型模式匹配
- Java:对一个值进行条件判断,返回针对不同的条件进行不同的处理
1 | 变量 match { |
- 具体代码实现
1 | object MatchApp extends App { |
加条件的模式匹配
1 | def judgeGrade(name:String, grade:String) = { |
2. Array模式匹配
1 | def greeting(array:Array[String]) = { |
3. List模式匹配
1 | def greeting(list:List[String]) = { |
4. 类型匹配
1 | def matchType(obj:Any): Unit = { |
5. Scala异常处理
1 | object ExceptionApp extends App { |
6. case class模式匹配
1 | class Person |
7. Some & None模式匹配(略)
第7章:Scala 函数高级操作
1. 字符串高级操作
1 | object StringApp extends App { |
2. 匿名函数
- 匿名函数:函数是可以命名的,也可以不命名
- (参数名:参数类型) => 函数体
1 | scala> val m1 = (x:Int) => x+1 |
3. curry函数
1 | // 将原来接收两个参数的一个函数,转换成2个 |
4. 高阶函数
map
- map:逐个去操作集合中的每个元素
1 | scala> val l = List(1, 2, 3, 4, 5, 6, 7, 8) |
filter
1 | scala> l.map(_ * 2).filter(_ > 8) |
take
1 | scala> l.take(4) |
reduce
scala当中的reduce可以对集合当中的元素进行归约操作。两两相加
reduce包含reduceLeft和reduceRight。reduceLeft就是从左向右归约,reduceRight就是从右向左归约。
1 | scala> l.reduce(_ + _) |
flatten
所有元素都压平
1 | scala> var f = List(List(1,2),List(3,4),List(5,6)) |
flatMap
1 | scala> f.map(_.map((_ * 2))) |
5. 偏函数(略)
第8章:Scala 隐式转换
需求:为一个已存在的类添加一个新的方法
Java:动态代理
Scala:隐式转换
双刃剑
Spark/Hive/MR… 调优
1 | import java.io.File |
第9章:Scala 操作外部数据(略)
第10章:综合案例(略)
1. 项目概述
- Spring Boot + Spring Data + Scala + Java 混编
2. 项目需求
- 论统一元数据管理在大数据平台中的重要性(SparkSQL/Hive)
- 构建大数据统一元数据管理
- 元数据管理:MetaStore
- 采集
- 维护
- 稽查
- 分析
3. 项目需求分析
- 本个项目实战:
- 数据库管理
- id:数据库编号
- name:数据库名称
- location:数据库存放在HDFS/S3/OSS等文件系统上的目录
- 表管理:表是要属于某一个数据库
- id:表编号
- name:表名称
- tableType:表类型
- dbId:该表所属的数据库id
- 默认存储路径:db对应的location/tableName
- 数据库管理
4. 功能开发
5. 使用postman进行交互测试
6. 扩展
附录一:Scala 图解
在线运行地址:图解 Scala 基本语法代码片段
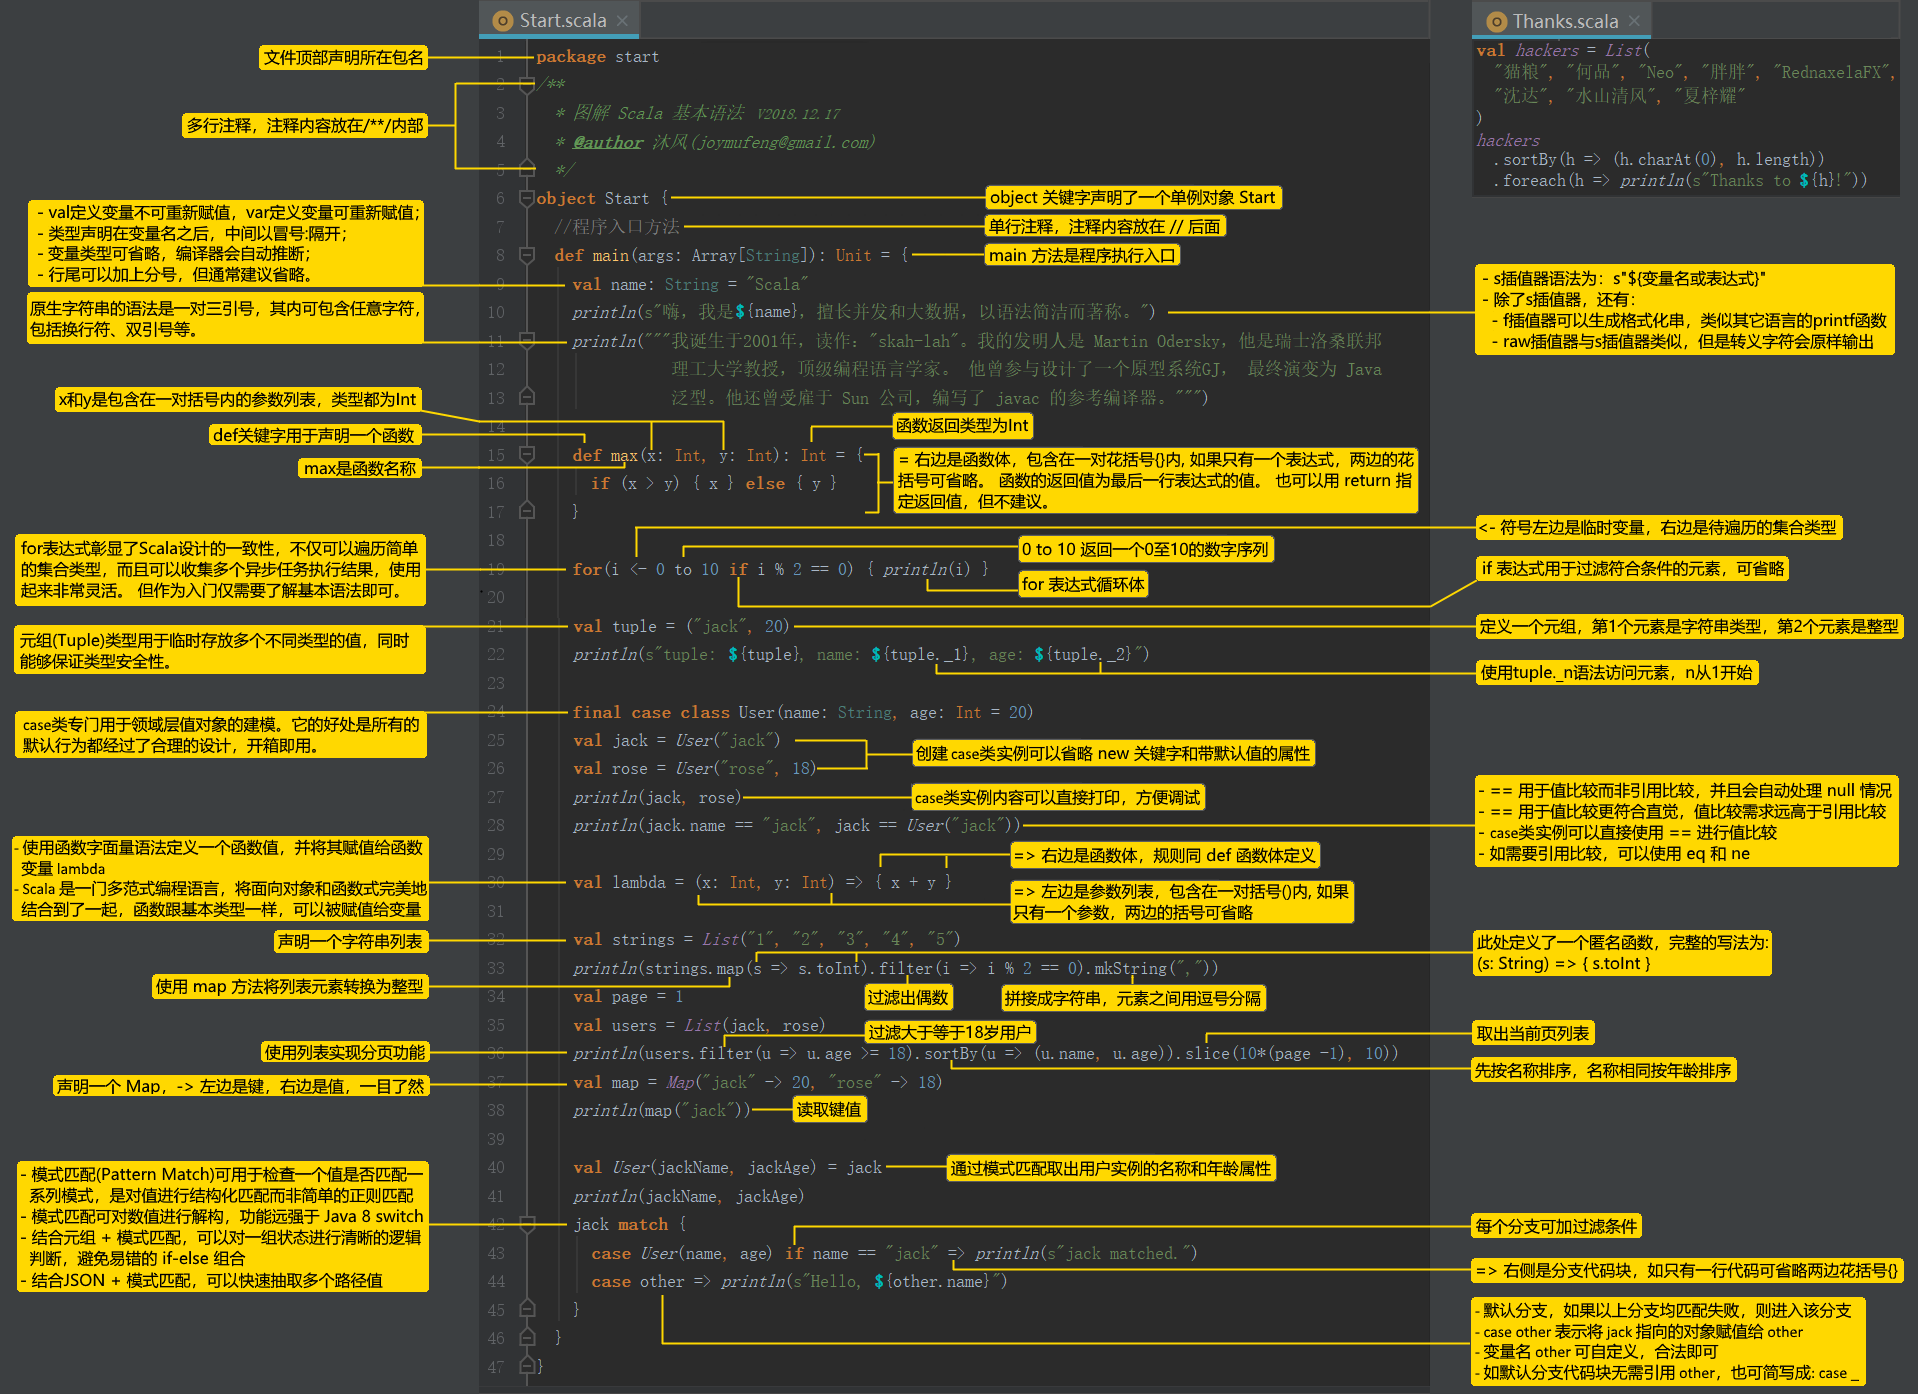
(来源:图解 Scala 基本语法 V2018.12.17 - PlayScala中文社区 | Scala中文技术交流社区)

